This article explains how to export multiple toolpaths into job files using Vectric. This is useful if your job requires tool changes, or has multiple toolpaths that use the same tool.
This article explains how to export multiple toolpaths into job files using Vectric. This is useful if your job requires tool changes, or has multiple toolpaths that use the same tool.
Once you create toolpaths, you can export them into a job file. If your job has several toolpaths (and require different tools), you can export them into multiple files.
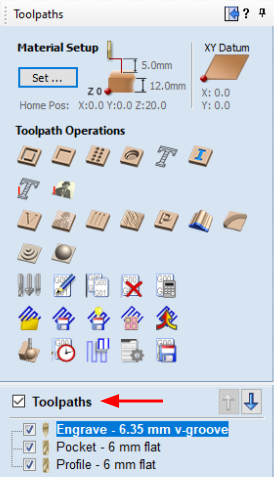
Click on “Toolpath” on the right hand side of the Vectric screen. You will see a list of created toolpaths.

How to rename a toolpath
We strongly recommend renaming the toolpaths in a way you understand what cutter is used.
Right click on a toolpath name and select “Rename” from the menu.

This will activate the name text. Type a new name and press Enter on the keyboard.

Repeat for all toolpaths to achieve a result like this:

How to preview a toolpath
If the check box next to a toolpath is ticked, Vectric will show a preview of this toolpath.

Tick on the check box next to Toolpath to select or deselect all the toolpaths.

How to arrange the order of operations
The order in which the list is sorted will define the order of operations. Carefully check if the order is correct.
In this example you can see we have 2 different tools used. We have an engraving tool used for the first toolpath, and then a 6mm cutter used for the rest of the job.
You can rearrange the order of operations by selecting a toolpath and moving it up or down using the arrows.

How to export toolpaths
Once you are happy with the order of operations, you have a choice of how you want to export the files:
Make sure all toolpaths are selected by clicking on the “Toolpaths” tick box.
Click on the Save Toolpath button.

Select “Visible toolpaths to multiple files”, and tick the “Group where possible” box.

Select YetiTool SmartBench in the Post Processor dropdown list.

Ensure (Output direct to machine) is unticked
Click on “Save Toolpath(s)...”.

Specify location and name for your files. The specified file name will be used as a prefix for the multiple files created in this step. Click on Save.

Vectric will create multiple files:

Note the file names structure:
-
All files contain the prefix specified as a file name during Save Toolpath operation;
-
Followed by the sequential number in the list of the toolpaths;
-
Followed by the name of the first toolpath, which was grouped with the other toolpaths using the same tool (in our example it is 6mm mounting holes). The toolpaths 2 and 3 were grouped because they use the same tool and they follow each other.
Click here to learn how to transfer a job file to SmartBench.