How to install the Z Head on SmartBench.
< Previous | List | Next >
You will need

Installing the Z Head
Positioning the Z Head
Set up the position for the Z Head prior to mounting it.
The Z Head assembly has to be inserted from the far end of the Upper X Beam, with the extraction elbow facing towards you (pointing away from the Y Bench).
A: Extraction elbow

Do not try to insert the Z Head from the home end of the Upper X Beam.

Align the Z Head wheels and pinions with the Upper X Beam channels
Prior to inserting the Z Head, you will need to align the wheels and pinions of the Z Head with their corresponding channels.
B: Z Head wheels
C: Pinions

The Upper X Beam channels for the Z Head wheels and pinions are shown below.
D: Pinion channels
E: Wheel channels

Use the motors on the sides of the Z Head to hold, lift or position the Z Head along the beam.
F: Z Head motors

Position the Z Head on the Upper X Beam as shown:

Take care to align the wheels with the inner channels, and the pinions with the outer channels.
G: Pinion
H: Wheel
G1: Pinion channel
H1: Wheel channel

The wheels (H) and the pinions (G) should fit to their respective channels for correct fitting like this:

Loading the Z Head into the Upper X Beam channels
Load the Z Head by inserting the wheels into the Upper X Beam channels until the Z Head holds onto the beam.
Load the Z Head partially into the channel, or leave the bottom Z Head tab sticking out of the channel. This is to prepare for the drag chain latch plates to be fitted.
I: Bottom Z Head tab

Connecting the signal cable and latch plate
Connecting left hand side latch plate
Pull the signal cable through the recess channel.
J: Recess channel
K: Signal cable
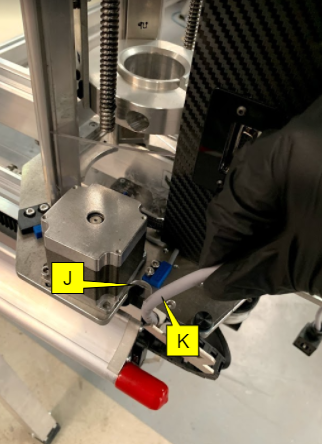
And rest the signal cable on the recess channel like this:

Place the drag chain latch plate over the rectangular face on the left hand side of the Z Head bottom plate.
L: Latch plate
M: Z Head bottom plate


Ensure the signal cable sits in the recess channel on the left of the latch plate, as shown below.
K: Signal cable
J: Recess channel
L: Latch plate

|

|
Ensure the latch plate sits on the tab of the bottom Z Head plate, and is not partially fit or misaligned as this can damage the wheel channel.
|
Successful fitment of the latch plate should look like this:

Incorrect fitting is where the latch plate does not properly sit on the tab of the bottom Z Head plate.

Secure the latch plates on the bottom Z plate with a thumbscrew.
N: Thumbscrew

Connecting signal cable
The signal socket located on the left hand side of the Z Head connects to the signal cable.
O: Signal cable
P: Signal socket

The Z Head signal cable has a thumbscrew on the top. Plug the signal cable to the socket, and secure it with the thumbscrew.
Q: Signal cable thumbscrew
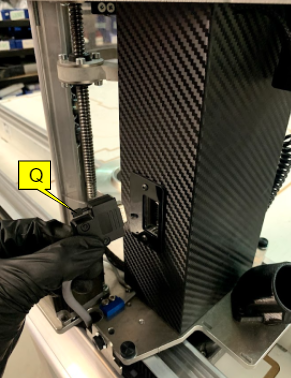
The signal cable connection should look like this:

Connecting the power cable and latch plate
Connecting right hand side latch plate
The power cable is located on the right hand side of the Z Head. Pull the power cable through the recess channel.
R: Power cable
S: Recess channel

Rest the signal cable on the recess channel like this:

Place the drag chain latch plate over the protruding face on the right hand side of the Z Head.
T: Z Head bottom plate
U: Latch plate


Ensure the signal cable sits in the recess channel on the left of the latch plate, as shown below.
R: Signal cable
S: Recess channel
U: Latch plate

|
|
Ensure the latch plate sits on the tab of the bottom Z Head plate, and is not partially fit or misaligned as this can damage the wheel channel.
|
Successful fitment of the latch plate should look like this:

Incorrect fitting is where the latch plate does not properly sit on the tab of the bottom Z Head plate.

Secure the latch plate in place with a thumbscrew.
V: Thumbscrew

Connecting the power cable
The power socket located on the right hand side of the Z Head connects to the power cable.
W: Power cable
X: Power socket

The Z Head power cable has a thumbscrew on the top. Plug the power cable into the socket, and secure it with the thumbscrew.
Y: Thumbscrew

The power cable connection should look like this:

Connecting the spindle
If your SmartBench already comes with a spindle pre-installed in the Z Head, then read through to learn about how to connect the spindle cables to the Z Head.
If the spindle is not already installed, click here to learn how to load the spindle into the Z Head.

The spindle has two cables which connect to the Z Head.
Z1: Z Head spindle-power socket.
Z2: Spindle power cable.
Z3: Spindle signal cable.
Z4: Z Head spindle-signal socket.

Plug the spindle power cable (Z2) into the Z Head spindle-power socket (Z1).
Plug the spindle signal cable (Z3) into the Z Head spindle-signal socket (Z4).

Fully engage the Z Head
|

|
Check that both latch plates and all cable connections are properly mounted and secure.
|
When you are ready, push the Z Head onto the Upper X Beam until all wheels are engaged.


< Previous | List | Next >