This article explains how to change the tool for the next part of our job.
SmartBench doesn’t have an automatic tool changing facility. You will need to change the tool manually after the first job has finished, and before starting the next job.
|

|
Do not power off the SmartBench at any time in the tool change procedure.
If it is powered off it will lose its current XYZ position and will need to be rehomed. This may lead to inaccuracies in the work due to unavoidable variations in the home position.
Click here to read more about homing procedure.
|
|

|
Fitting a tool incorrectly can lead to serious damage to SmartBench.
Click here if you get stuck at any point, or if you need more information about how to fit a tool correctly.
|
|

|
This article gives a quick overview of which tool we need for the next job, and how to do a tool change.
|
Loading the next job file
SmartBench will stop, and the console will show a job complete screen when the first job has finished.
Press anywhere on the console screen to return to the PRO app.

Go into the file chooser, and load the next job file, “First Routing Project_2-3-6mm Mounting holes and contour.gcode”.

Changing tools
Change to the tool required for the next job file.
|

|
Do not power off the machine and just proceed with the tool change.
|
Unload and unplug the spindle motor from the Z Head.
Click here to learn more about how to unload the spindle motor from the Z Head.

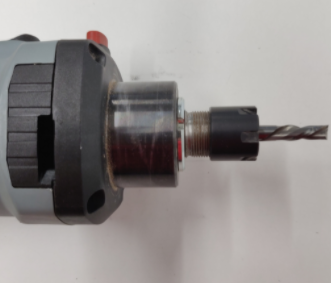
Undo the collet nut, and remove the v-groove cutter.
Click here to learn how to fit a cutter into the collet.
Fit the 6mm end mill cutter, and tighten the collet nut.

Load the spindle motor back into the Z Head.
Click here to learn how to fit the spindle into Z Head.

Set a new Z datum
When the tool change is complete, you need to set the new Z datum.
As we did before, set the Z datum with respect to the spoilboard, using the probe plate and the SmartBench console.
Click here to read more about setting the Z datum.


Starting the next job
You can now start the next job.
Press the green play button on the far right of the console, and follow the on screen instructions.

You will be asked if you are using a Stylus or the router, in this instance we are using the router.

When you are asked whether the Z Head should raise on a job pause, select “Yes”.

Accept the safety screen.
And press GO

< Previous | List | Next >