What is overload?
To protect itself, the spindle measures its own current, speed and temperature - and if these parameters exceed their tolerances, the spindle will signal an overload and shut down.
Before a shutdown, varying degrees of overload will be indicated by:
- the illumination of the setting wheel changing from blue to red, and
- the overload on the console indicating an overload percentage.
How to reset a spindle after overload
Stopping/ending/pausing a job will reset the spindle and return it to it's normal state. However, if a cause of overload continues to exist, then the spindle will overload again in the next operation.
The cause of overload must be resolved. Continue reading to identify and eliminate various causes of spindle overload.
Step 1: Check the connections
If the data cable has come loose, this will cause an overload alarm on the console.
Check that both the power connector and speed control cable are plugged in fully:
- on the Z-Head side and that the speed control cable is screwed onto the spindle tightly.
Especially check the speed control cable on the Z-Head side with the USB type B connector. Make sure it fully clicks into place.
After plugging these in fully, test your spindle again.


Step 2: Check that the spindle is turned on
The spindle for safety reasons has a on off slider on the side, check this is on (Fig 1)


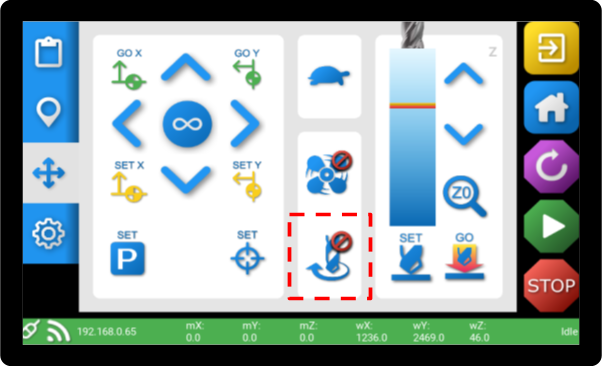
Step 3: Running the spindle without a job file
If that doesn’t work the next step is to:
Go to the CAD/CAM App then to the move section in the left hand side
Press the “Spindle on” button (shown below in the red box). You should hear the spindle come on.
If this resolves the issue, there will be a problem in your job file. This can be resolved at the bottom of the page
Step 4: Check that the spindle hasn’t been overtightened
Once the clamping torque has been achieved, apply an extra 1/8 turn maximum. Over tightening will damage your spindle bearings and potentially overload the spindle

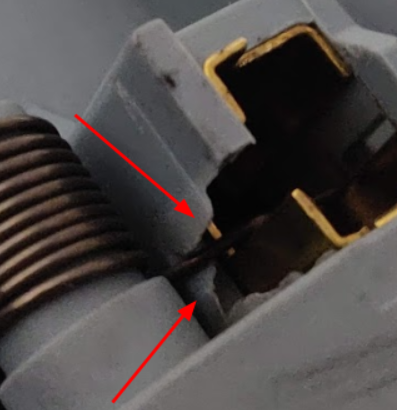
Step 5: Check the spindle brushes and clean inside cover
*When removing the rear cover note the speed dial location as this will need to be reinserted in the same position*
Check that the brushes are still over 9.5mm long, an instruction video is located here
With the rear cover off also check that the brush wire is installed on the correct side furthest from the PCB - see this link for further reference. Make sure the brush wire is above the retaining spring and not fouling on anything especially when the rear cover goes back on.
Clean any dust or debris from inside the brush housing while they are removed. Also clean the PCB of any extra debris.


Step 6: Remove IM flashing
On older SC1 spindles a fault was identified which prevented the spring and the brush from moving down correctly.
Using a knife, cut away an excess flashing to allow spring to move freely.

Step 7: Check power crimps
Check power connection crimps (both sides).

If loose, use pliers to close them over


Step 8: Check if there is a 10mm nut on the speed control connection
If there is a 10mm nut on the outside of the case, holding on the speed control connector please remove this and do not put it back on the spindle.
After this please contact support for an extra O-ring


Speed setting of the spindle
If the issue lies in your job file:
Go through this article which runs through recommended Feeds and Speeds and check that you are running closely to the recommended figures
As a final step ensure the spindle speed is over 5000rpm as this is the minimum speed for the spindle, anything lower will cause issues
Check that you are using the Yeti tool post processor if using Vectric or Fusion for your designs, and exporting in MM - see the below example in Vectric
