How you can restart a job that’s been cancelled or interrupted, so that you can save time if things go wrong.
When can I use job recovery?
You can use job recovery almost any time a job has been unexpectedly cancelled or interrupted:
-
If the cutter breaks,
-
If the spindle motor brushes wear out,
-
If you need to pause and cancel the job,
-
If SmartBench stalls against something unexpected, and loses position,
-
If there was an alarm that cancelled the job.
|

|
SmartBench will only remember the most recent job, so running a new job will overwrite the previous job that was staged for recovery.
|
Optimising accuracy
In order to set your restart position as accurately as possible, follow these tips:
-
Choose a visually obvious restart point, such as a corner.
-
Position the toolpiece such that it lightly touches the edge of the existing cut path.
-
Use the Nudge screen to refine the position of the tool bit if SmartBench has been re-homed or power cycled.
When is job recovery not available?
GRBL errors
You should not recover a job that has been cancelled due to a GRBL error, because this is caused by a problem with the job file itself.
In this scenario, you should check and re-generate your job file, and run it through the file check to ensure that it has no errors.
Click here to learn more about GRBL errors
|

|
Occasionally, GRBL errors can be caused by a buildup of static electricity.
If they occur at seemingly random points during the job, you may need to assess how your extraction is earthed.
Click here to learn more about earthing your extraction system.
|
Power loss
Job recovery does not yet handle power loss scenarios; in this event you will still need to restart your job from the beginning.
Irrecoverable GCode files
Job recovery does not yet handle relative and less commonly used GCode instructions, including:
-
Incremental distance mode G91
-
Arc distance modes G90.1 and G91.1
-
Feed rate modes G93 and G95
Cancelling a job
In order to recover a job, you must first have a job that has been recently cancelled - either manually or automatically.
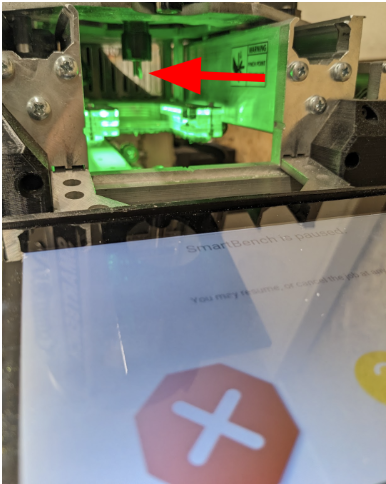
Imagine that you are part way through a job, and you realise that a cutter has snapped. You can cancel a job by first pressing the pause button, and then the cancel button.
Click here to learn more about how to manually pause and cancel a job.
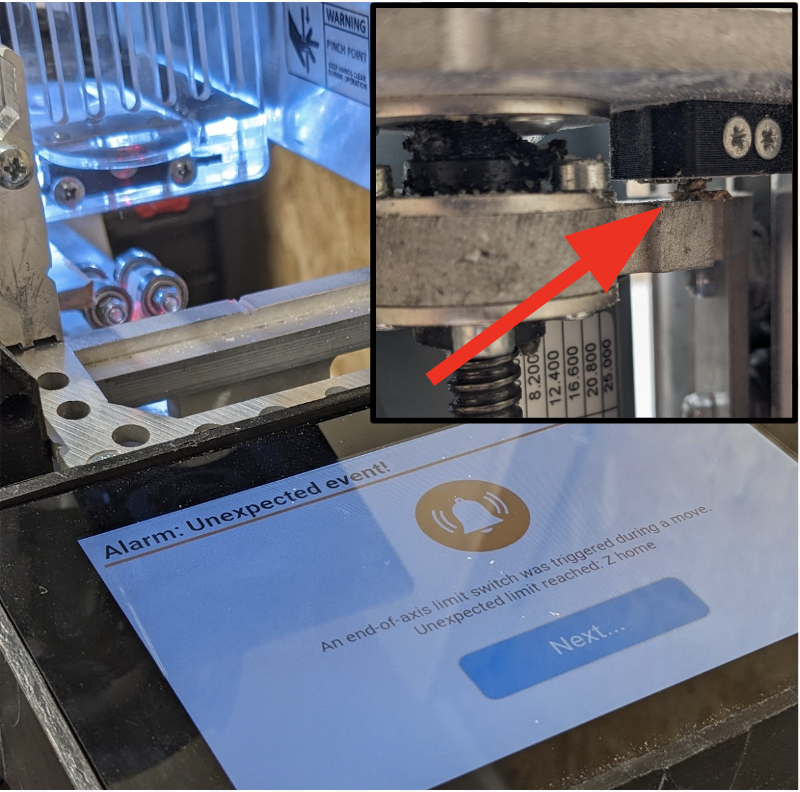
In the event of an alarm, SmartBench will automatically cancel the job for you.
|

|
You can only cancel and recover one job at a time. If you run and cancel a new job, it will overwrite the old one.
|
Preparing for job recovery
|

|
Pay close attention to this section to prevent damage to your workpiece and SmartBench, and prevent future job failure.
|
Ensure that the cause of job failure has been rectified
Find the cause of the failure prior to attempting to recover a job, and fix it before restarting.
If the job failed because SmartBench hit an obstacle (e.g. a workholding screw), ensure that it is removed, and check there are no further potential obstructions.
If the job failed because a cutter broke or wore down, ensure that it is replaced before continuing.
Prepare the tooling and work area
SmartBench will automatically lift the Z axis during the job recovery process, and you will move SmartBench in the XY plane during job recovery.
Therefore, it is critical that all axes and the workpiece are clear of obstructions before you start.
You will use the tool to find an accurate recovery position, so ensure that your tooling is set up correctly for the job prior to starting the job recovery process.
|
|
If you are recovering a job that uses an undercut router bit, you should manually raise the tool out of the workpiece prior to starting the recovery process.
|
Recovering a job
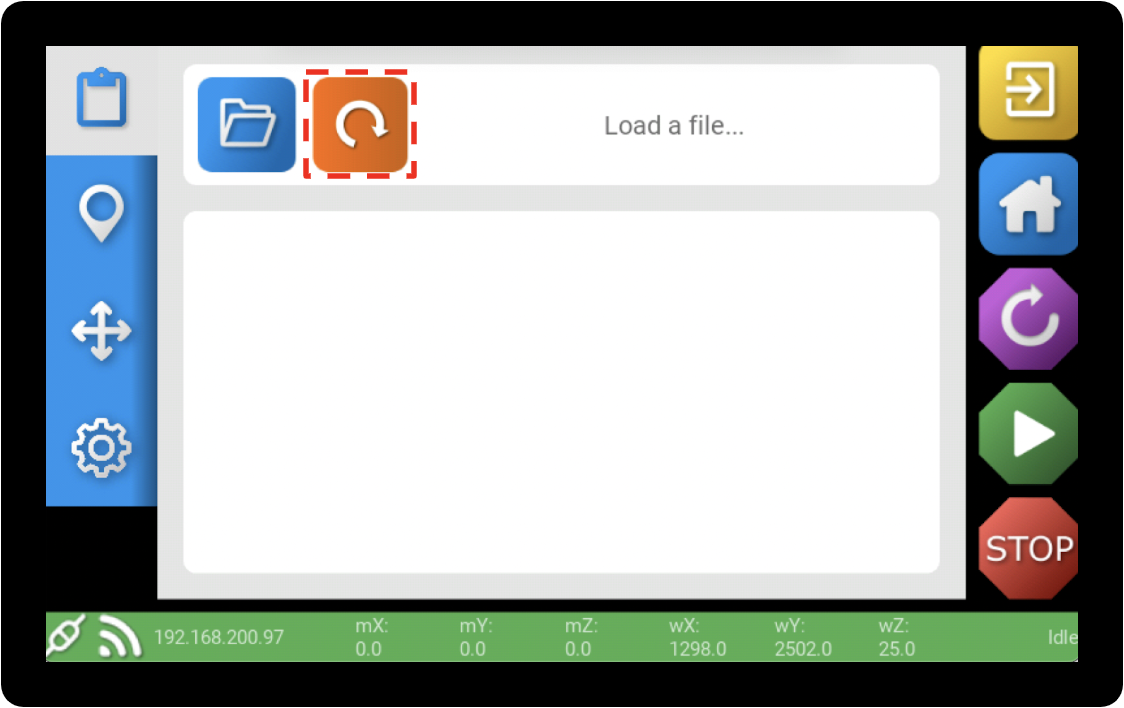
Navigate into the PRO app, and press the orange recovery button.
|
|
The recovery button will only be orange if there is a job available to be recovered.
If the last job was completed, it will be grey and will only allow you to reload the job from the beginning.
|

You will be given the option to restart the job from the beginning, or to recover the job.
Select “Recover job”.
Option to rehome SmartBench
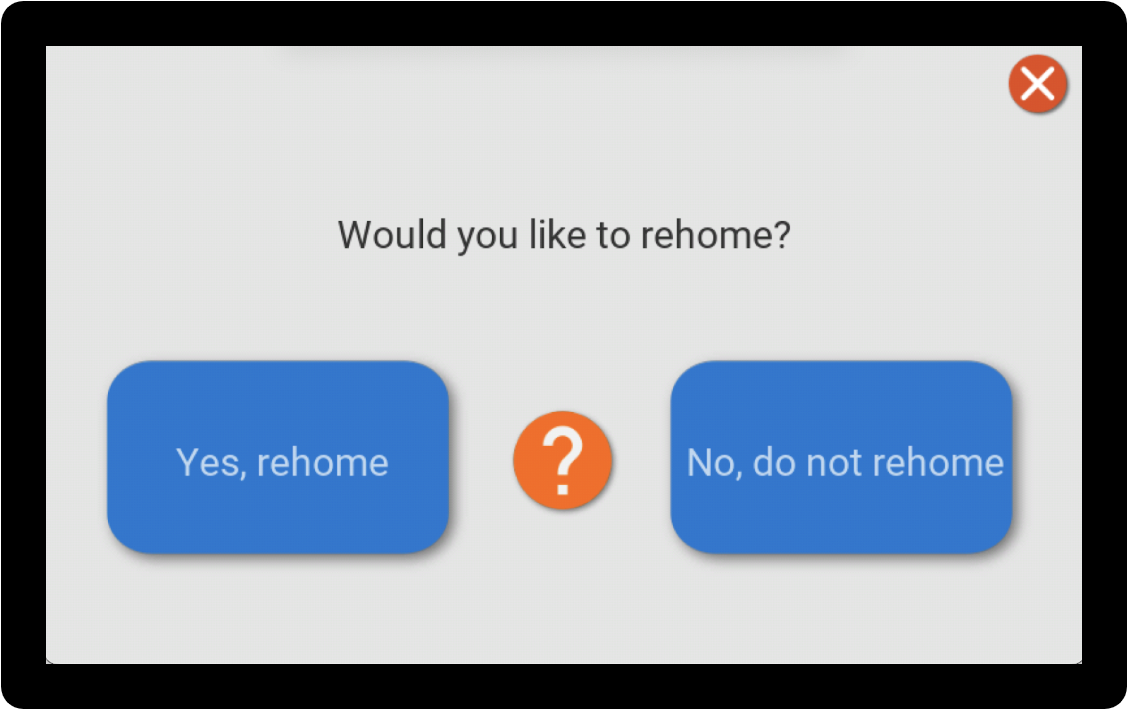
You will be given the choice to home SmartBench.
Always rehome SmartBench any time it has lost position.
|
|
You will be given the option to make adjustments to the exact position of the cutter later in the recovery process, so you will be able to correct for any minor differences between homing positions.
|
Choosing a line to restart the job from

You can restart your job at any point from the beginning of the job, to the last line processed by SmartBench.
This means that if SmartBench missed part of the cut (e.g. because of a broken cutter), you can resume the job at any point along the toolpath.
|
|
Arc segments (i.e. curves and circles) are processed differently from linear machine commands, and so the tool may be positioned slightly earlier along the cut path than the point at which SmartBench stopped cutting.
|
Positioning the tool

Use the Z move buttons to lower the tool into the workpiece, so that you can accurately judge the correct position to restart the job from.
Using Go XY

Use the GO XY button to send the cutter to the position that SmartBench was at when it was processing the selected line.
You can use this functionality to check your line selection against the workpiece.
Scrolling through the GCode

Use the arrows to scroll through the job, and find the point you want to restart the job from.
It may help to restart the job from a distinctive feature or a corner, so that you can adjust the starting position of the cutter as accurately as possible.
Entering a line number
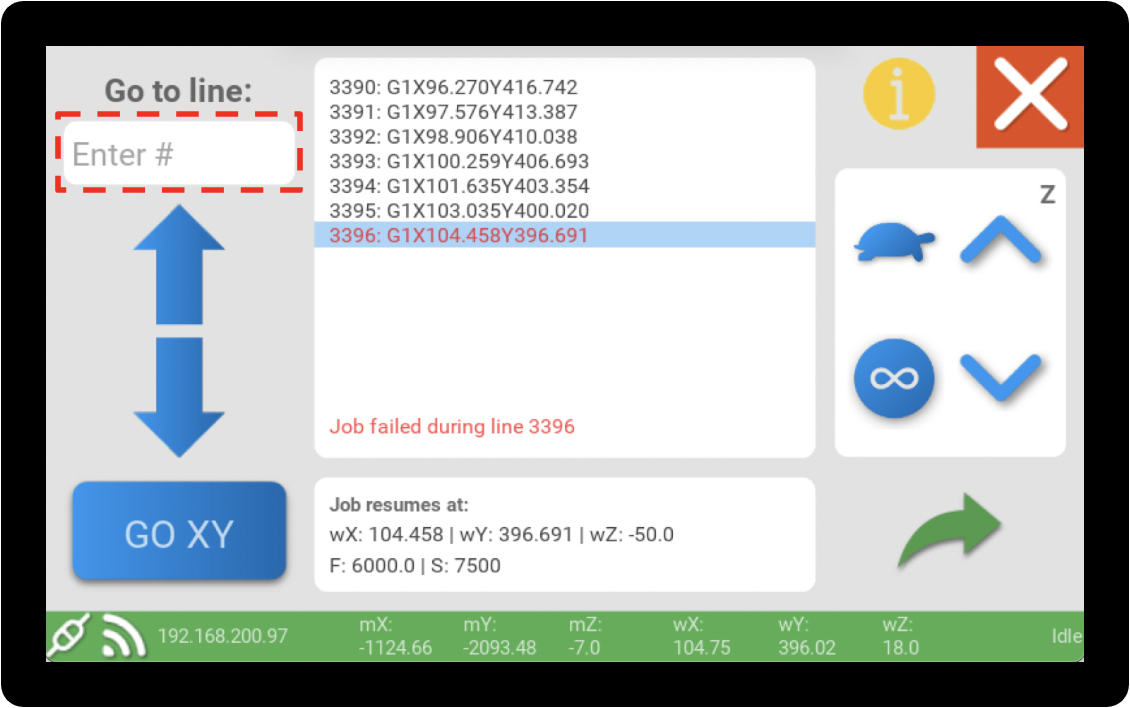
Instead of using the arrows to scroll through the job, you can enter a line number if you know where you want to restart the job from.
Current line modes
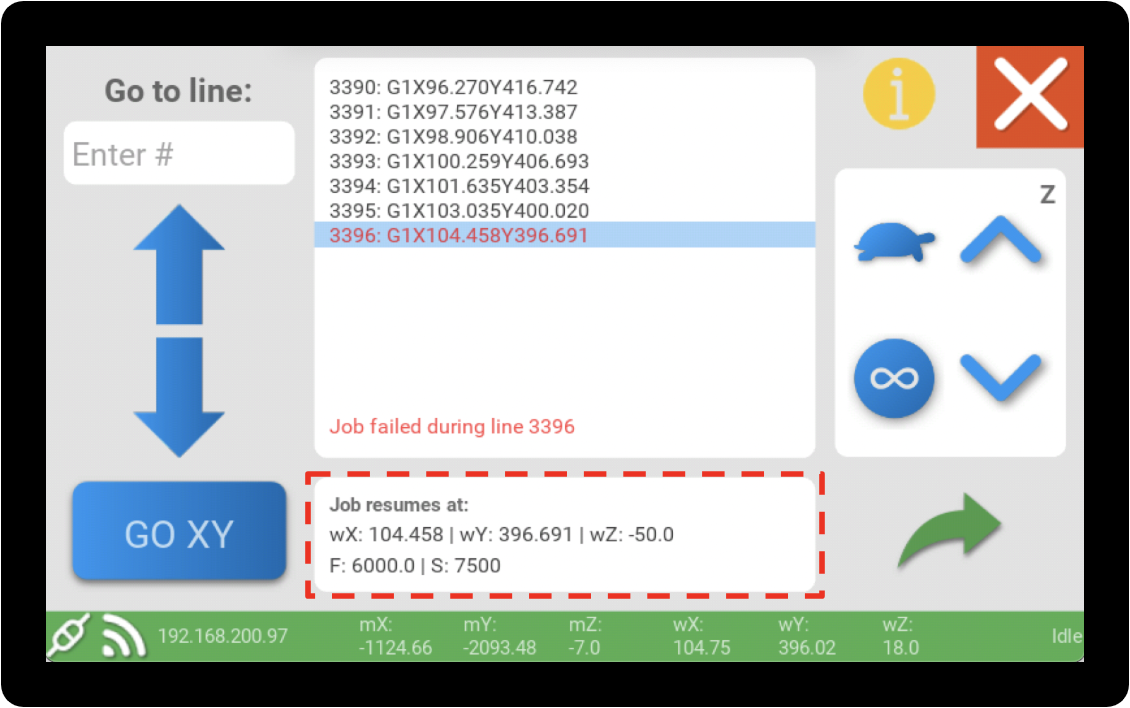
The bottom of the screen will show you the working coordinate, the feed, and the spindle motor speed for the selected line.
Setting the chosen line

When you have selected the point the job will restart from, press the green arrow to proceed to the next screen.
Optional nudge

|
|
You should only need to use this screen if SmartBench has been:
If the job has been cancelled with no loss of or change in SmartBench’s position, then continuing without nudging will result in a more accurate job recovery.
|
Nudging is an optional feature that allows you to manually adjust the position and datum of SmartBench in the XY plane. It comes in handy when SmartBench experiences any positional loss, such as a stall or a re-home.
By nudging the datum, you can make micro-corrections to the XY starting point of the tool, ensuring it resumes cutting exactly where it left off.
Skipping the nudge

To continue without nudging, press the green arrow. This will return you to the PRO app, ready to start the recovered job.
Refining the position of the tool
Use the manual move buttons to lower the toolpiece into the existing cut path, and carefully refine its position in the XY plane.
When the toolpiece is in the correct position, it should lightly touch the edge of the cut path. This will ensure accurate alignment with the previous cut paths.
Check the X and Y axes individually. Look for any slight deviations from the desired position.
If necessary, make minor adjustments to the X and Y axes. Typically, these adjustments should be less than 3 mm.
|
|
It's crucial to be cautious when nudging your tool.
Improperly adjusting the start point by placing it too far away from the last physical cut path, can result in damage to your spindle motor, cutting tool, and/or workpiece.
|
Saving the new position of the tool
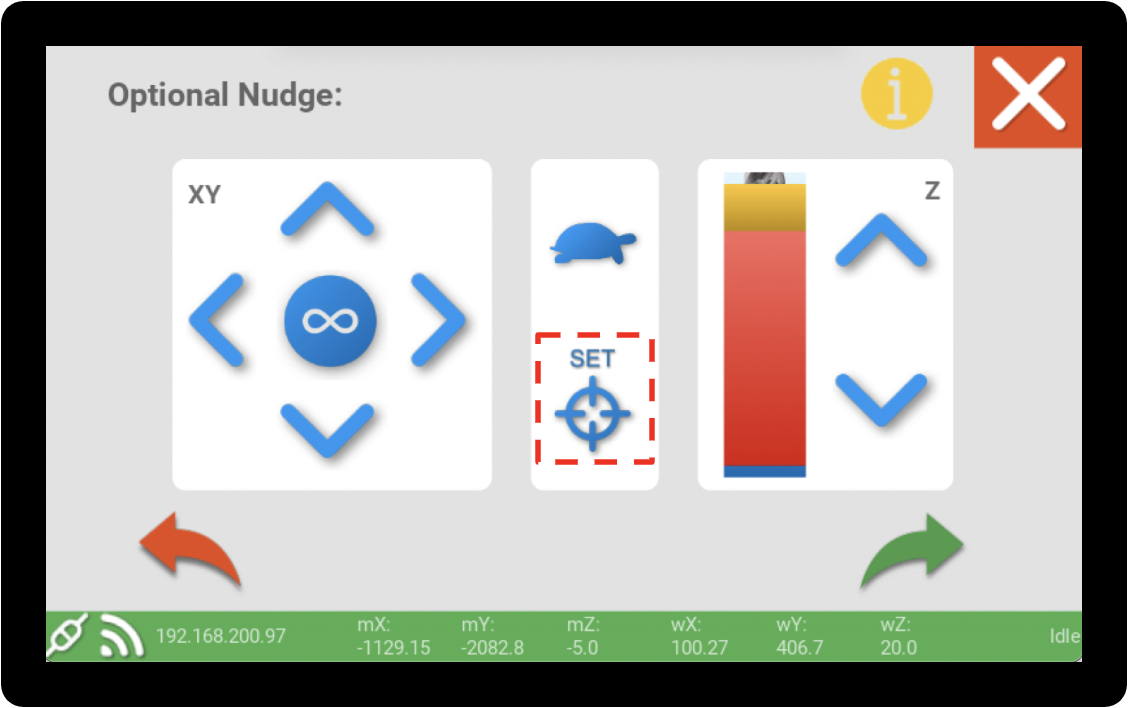
After nudging the X and Y axes to the desired position, press the "SET" button to save the adjustment.
|
|
This will change the XY datum, and cannot be undone.
|
Setting the Z datum

If you need to correct for a stall in the Z axis or perform a tool change, use the standard functions available in the manual move screen to set the Z datum.
Click here to learn more about setting the Z datum.
Starting the job

Once the job has been recovered, it will be loaded like a normal job. You can then start a job as you usually would from the PRO app.
Click here to learn more about starting a job.
Click here to go to the previous section on pausing a job.