This article explains how to set job file X, Y and Z datums in Vectric.
< Previous | List | Next >
The job file datum is set when designing the job in the CAD/CAM software. We’ll show you where the buttons are, and then illustrate the workflow with an example.
While we will show you this example in Vectric V Carve PRO, you will need to set your job file datum via a similar workflow in other CAD/CAM software packages.
How do I set a job datum in Vectric?
The job file datum is set up in Vectric as you create a new job.
Open Vectric and click on “Create a new file”.

Setting the job file datum’s position in the XY plane
In the XY Datum Position section of the Job Setup you will have a choice of 5 options for positioning the job file datum in the XY plane:

Click here to learn more about the pros and cons of choosing different datum positions.
Setting the job file datum’s position in the Z axis
The Z Zero Position section of the Job Setup window is where you set the position of your job file datum in the Z axis.
You can choose from two options:
-
Material Surface: the job file datum will be positioned on the top surface of your stock material.
-
Machine Bed: the job file datum will be positioned on the bottom surface of your stock material (which is functionally the same as the top surface of your spoilboard).

Click here to learn more about the pros and cons of choosing different datum positions.
Save settings
After choosing your settings, click on the OK button to save the job file datum.

Where do I see my job file datum as I design my project?
The position of the job file datum is marked with the 0s on the rulers, and by the crosshair in the job screen.
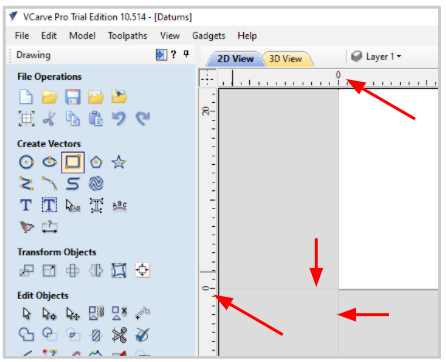
For example, if you want to change your job file datum to be in the centre of the job, the crosshair and position of the 0s will change its position accordingly.

How do I edit my job file datum in Vectric?
If you need to change the settings for the job file datum later, you can open the existing file and go to Edit > Job Size and Position.

The Job Setup window will open, where you will be able to check or change the settings.
Axis orientation on Smartbench
It is important to draw the features of the job in the same orientation as it will be cut.
The job axes orientation and job datum position cannot be changed on SmartBench; SmartBench will only align the job datum with the working datum.

X and Y axis
The width (X) and height (Y) of the job will align with SmartBench’s X and Y axes, respectively, when it is loaded onto SmartBench.

|

|
Note how the orientation of the job in Vectric matches the orientation of the axes on SmartBench.
|


Z axis
The thickness (Z) of the job will align with SmartBench’s Z axis when it is loaded onto SmartBench.

A worked example
In this section we will show how we can use Vectric (CAD/CAM software) to set a job file datum for a simple project.
For this example, we have a stock piece of material which we want to cut two circles from.
A: Stock material
B: Circular parts

Using the steps described above, we will set the job file datum in the bottom left corner and on the top surface of the stock.
In Vectric, this means that we need to set:

We will then generate a toolpath (we won't detail how here. Click here if you want to learn more about how to create toolpaths).

If we look top-down on the stock and the XY plane, the job file datum is on the bottom left corner of the job.

If we take a side on view of the job, the job file datum is on the top surface of the job.

When we position this job on SmartBench, we will position SmartBench’s working datum on the top surface of the stock material, and on the corner of the stock that is closest to SmartBench’s home position.
< Previous | List | Next >