This article shows you how to install the SmartTransfer App on your computer.
< Previous | List | Next >
This download page is split up into sections below:
1: Important pre- reading
2. Download file
3. Common security pop ups
4. Further information about SmartTransfer and how to use it
Important pre-reading about SmartTransfer use to ensure it works correctly:
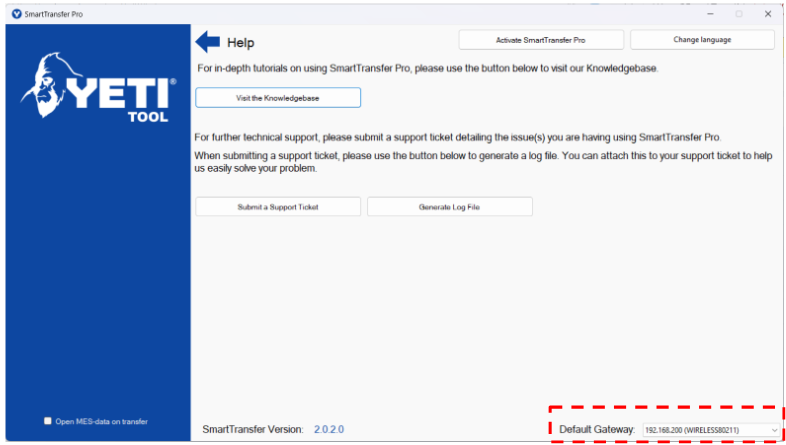
Once SmartTransfer has been downloaded to find your SmartBench correctly you will need to setup your default gateway otherwise it will be unable to find your SmartBench
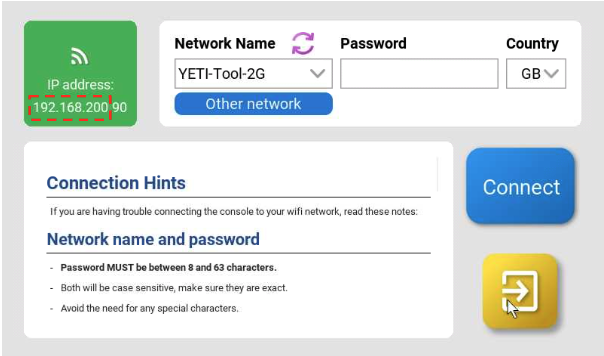
In this worked example the console has an Ip address of 192.168.200.90 so we need to select a default gateway of 192.168.200 in the Smartransfer default gateway dropdown box.
You will need to match the first three sections of your own console IP address when selecting your default gateway. The console IP address can be found either in the Wi-Fi application or the main CAD/CAM application on the console
To select a default gateway on SmartTransfer click on the "Help" button in the top right hand side. Once in the Help section you are able to select the correct default gateway in the dropdown box in the bottom right.
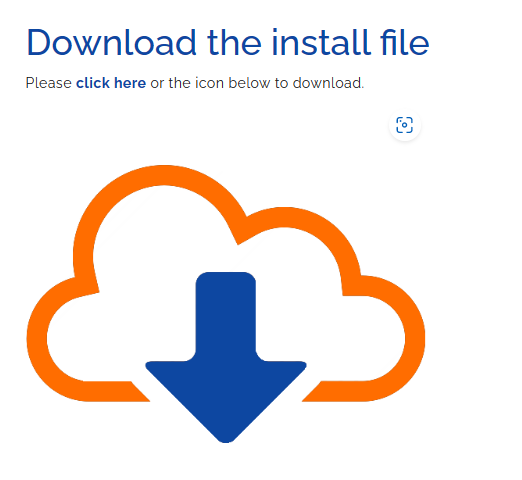
Download the SmartTransfer install file
Please click here or the orange download icon below to download.

|

|
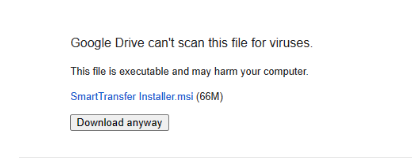
When you click on the above links this will open a new tab. The link can take some time to generate, so please be patient.
|
The new tab will open a download link, click on the “Download anyway” button.

You will see the download progress usually in the bottom left or top right (depending on your internet browser) of your screen.

Common Security Pop Ups
Depending on your computer setup you may have some security pop ups to navigate through, these are shown in the below steps:
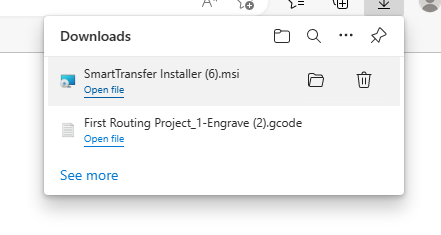
Step 1: Click the download file
Step 2: Click Download Anyway
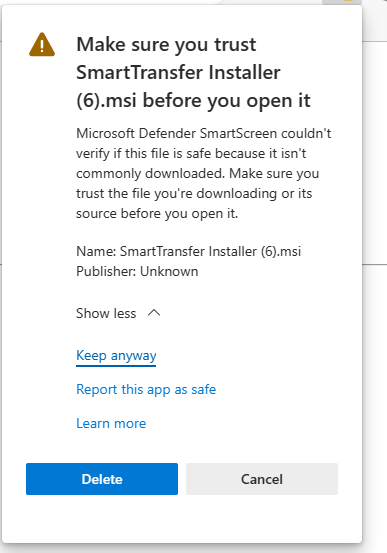
Step 3: Hover your mouse over the “SmartTransfer Installer.msi isn’t commonly downloaded” box that comes up

Step 4: Click on the three dots that appear and then the Keep option

Step 5: Click the (Show More V) button

Step 6: Press Keep anyway
Step 7: Click on the "SmartTransfer Installer" downloaded file
Step 8: Carry on with the rest of your install detailed below

Install
When the download is complete (no loading circle will show), right click on the application.

At the start of the installation process, you may be prompted by Windows Defender to tell you that the program is unrecognised.
Press “More info”.

Press the “Run Anyway” button that appears next to “Don’t Run”.

You may also be prompted to install .NET Desktop Runtime 5.0.X. This is a program framework that our app is built on.
Press “Install”.

When the installation has finished, the SmartTransfer application setup will open automatically.
Read on our “License agreement” terms and tick the checkbox which will open the option to install the application.

You will need administrator access to install the application.

After entering your administrator access code the download will start to begin.

Once the installation is complete click on “Finish”

< Previous | List | Next >