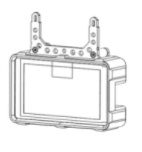
How to install the SmartBench Console to the bench.
< Previous | List | Next >
You will need
![](https://lh4.googleusercontent.com/7Jz44zPzD8oSilE1VMCKRZss48qqbJ4mChLO48mlA2xtkVmbke2xRhhg9671ftdbSIdtXII5WgFA9yVMrSWVWKqEyxO4jOjjQdY6AxyDgAp1aIOKf7WEaSaXY85MmA3nAlshp0jJ1rR9H9PuhQttMA)
Installing the Console
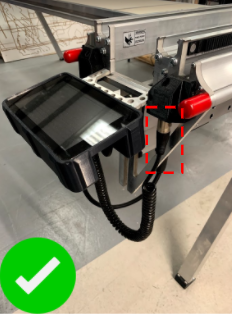
The Console attaches to the home end of the Upper X Beam by inserting the 2 forks into the end plate.
A: Console forks
![](https://lh5.googleusercontent.com/Sqd0d9yhTmEtHf96CXad07qlpTl7_73IrlS5DgBHX05yYGL_ET3M4nFCcaVpskSiwE8VYykBqsbKdB5rzDvw2xqGe5LpqXXfHctsx-eiY-tsd6xruSN2EXAXn8UYFF4jYbnaEK1x_aVI3aVoynS9HQ)
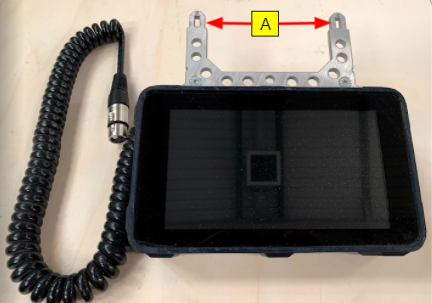
The slots for mounting the Console are at the home end of the Upper X Beam.
![](https://lh6.googleusercontent.com/IQKBqKqf8ipkZ_9nIzbDD2hbAOYuZKvjLXcXCqE6GWdWGP6T4psH-ssQ3X_UnXDYXordR4MAY31-FmWNuSp6sJOGOOGSZaHRwFwJDfitC0Jn6WUTuJ6YaggQ7fCcfZEcTu3EjsH40be2fqvIbF6H7g)
Ensure the forks are inserted fully into the mounting slots as shown below.
![](https://lh3.googleusercontent.com/QLDCIta1GvWVnoiRLtJL-mf_3kf69Wr_HlYAYrMmKcif1bMaKdFku_7vBn_4EMx1m_2ojslR5XpP2ZIooo7SBSAMnbUfk-roB2Y91eH4p1u-WeWzdi6y_wkhLKwDh7gJq54wQmvxsvRst1vBcEfy6g)
Adding the safety bond to the Console
The safety bond prevents the Console from damages in case of a loose fitting, or if the Console slips through the hands of the operator.
![](https://lh3.googleusercontent.com/9oSbA0gcSEEiT7MdJSJbQ3kCcB5_uSh7hG4aMvLLAyq3FWDHKzyDELDFWSe1uksK9N5si3qovpMruPDz5tR0-Hh8-1YQYw_T0C3WHnC2dzlqxeV-ZodxJgzPjpjGyh7BvkWZ8qCuOFanXbcVC_aMSA)
![](https://lh5.googleusercontent.com/chgdPtGjyAvc8tUjbjeNflMMluJloMRXpzC2dn1hjK6oO-r4Y18yiUebiojSsHKP4BuG6zdPZywz5UzGcoN9mUYcGKZ5dPSJ4HLNbdtGkpiZrL70hSp5oGIJDt4YQNIjkYtK0dMzoHAR7t-WF6S-ow)
|
Ensure the safety bond is always attached to the Console to avoid damage.
|
Loop the safety bond through the end plate on the Upper X Beam.
B: Safety bond
C: Upper X Beam
![](https://lh3.googleusercontent.com/biryqD-5KIjXzNHc1m1lLrU-Ouzc8kTU_2fexGIbj8uF_byyX86l7jMAMbHjBweQMbnIJEdZM4COqqcFcjmAEVrpgz2YpGvanFHIb3dy4i7ZhtGzhWMJYI1Z-omtLhVRjZphJZvSkPtauKaH5vs2rg)
Attach the safety bond to the Console mounting bracket using the carabiner.
D: Safety bond
E: Carabiner
![](https://lh3.googleusercontent.com/3oVQCAwYPV3hWpdsuzdrunL0kSQVZVkQ3ZXUJWXaJBJtgwH7Afn_JzcUgOXvDuA2UrNruwEB9uPf8lXxjWMb64ZG48XCMZvFKe3V_jLllfGgxoYZ87cMVhBHqzWsl7K0eyd18fHNmsN4zh0q0u9eyQ)
Connecting the Console cable
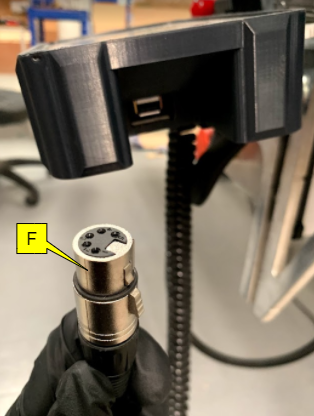
The Console cable is an XLR cable, which carries power to the cable, and signals to and from the console.
F: Console cable
![](https://lh6.googleusercontent.com/V4dW61xIOO8nTBFauD1PsoYKIvtG6h51AUUGYr0xhPFhyucWXEOUvVG_dSUDR2XCa5ElQoL2_0WOIgs7KtiIgsR1O8vqF8JLXGjD_voKw8nZteaEfyt5_LwUtzJEg1-oYWd9d3_Vt4gMJCIeQpbFWQ)
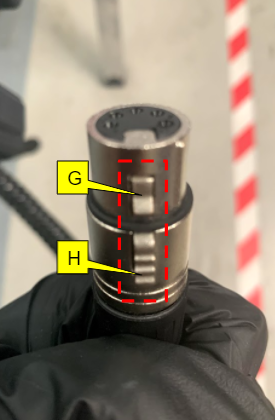
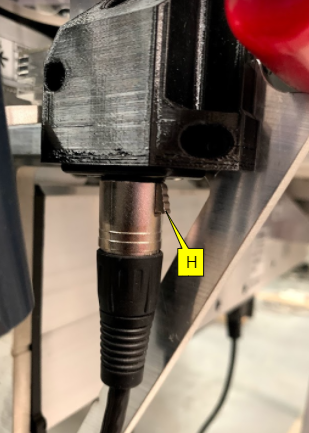
The XLR connector has a locking feature to secure it inside the socket. Pressing the button on the side of the connector will release the locking feature.
G: Internal latch.
H: Locking button.
![](https://lh6.googleusercontent.com/64LZ4LeolgVyQhPljKqJtLV6DwmtCXy5l81bwNTBvsXEqZE6azW34cJVN1oX2AkG9jQ4NbNzSnB3M8wChTWTu-jxi0db0_shd2TdwgEnGTNCE1RRBEa94oGzWwQSoOYWUBzcp9J6mRPTgofXIeL_2w)
The Console cable connects to the XLR socket located on the Upper X Beam or on the right hand side of the Console case fitting.
I: XLR socket
![](https://lh5.googleusercontent.com/d88Z1uqcZPHW21jsJuG40lHQhbzpdAZeALAk71OpkeEAe66thuVDJ_yTtFnAr-KlIMOIDf242uF1GXd_cAzrUA97bDJrdBtm3JpMjd_gL8A9fD3-6ETyyJVbGRksakIwep19OJEYTx20IJbYY9gCDA)
Position the cable connector so that the ridge on the side of the connector is aligned with the channel inside the socket.
J: Ridge on cable connector.
K: Channel inside the socket.
![](https://lh4.googleusercontent.com/Ow0yt23BDWGSSzPr0SSMOehhoyeoQT_o20WbvHwhJRgZoca1c0ifaE71jvoCnDox-J-7XkhhFz6R9mtIBP3Us-mKSMYamJQj2U-oq_-BoB55WOYLwsEUaTsyVflKITz02hQWZJpwAV_jEWFnrqlcMw)
![](https://lh6.googleusercontent.com/pkvjMQNQ7wQB3AZE9WRtDiXTw0oBhrwXvBfFI8febAAoksJOcV-Dz7CFWhW0sUaD9uFTJNWenfTkakZu0oNBQJ_TqUrIxh_p8Btdnj2fK1kHGs-EPwccK1pWu8y3JyL1iLKC98HeQ7MeR38DVu4qqQ)
Plug the XLR connector into the socket.
When the connector has been fully inserted, the locking button on the side of the connector will release, and you will hear a click.
H: Locking button.
![](https://lh5.googleusercontent.com/mUN9TCAPAseEqi6xRFDvlfKZLchUj3b8H5vxex69c7uT2CZI4FScbvCEKcE6mT2lsch-FubVWcz6P-IEb8daYY7Ck6Yvu2V90pNTAzovs8IyXHlm_4Ja7bV-Cf__COaJHFQ44DUprtEu5AZ2mc1mPg)
You can check that the cable is secured by gently pulling on it. If it has been fully inserted, the internal locking system will hold it in place.
![](https://lh6.googleusercontent.com/sr8bw3ggResO44JUFGQyqqohmS75MNf1jc7Ktp2kSu0mfyv7Xjp8fGtzDGVD4E9cU5rsCSw0xdR6v_D4wKZ3t4qiRMtX5lUOsWRcZgh6zE_z6vVQZs8hBY9Fnu4T1gtLbw5NFvBJnB5w_ZiLXTaMJg)
Disconnect the Console cable
To disconnect the Console cable, simply squeeze the locking button on the side, and pull the cable out.
H: Locking button.
![](https://lh5.googleusercontent.com/ih_p1SYayKTz2xRmjO1PDbTN71MWOGUIO5tedOa1VbLdps4-8NGJzSYl48xmJaZvrGKvp39gsPyIYtI3jGzFAOOjqp6s6BdsV6rZ5IsGTc5sT50H4iSNvz2qZR0teUsJmhVgnBOGgrdOxmmV1RoYIQ)
![](https://lh5.googleusercontent.com/yalgaQ-rRMQbxu5E28a_3eNMStV2OGBKaH8ktO4j0_T2_7_aGcr-JlptmA-vQOd0QnZ0I_FyWmMH4PKfqJDkem2bo4kxzWVgcNGDj2-aKiv91wayA1yRFUThv_VGKj-uraK3rCG3tqKUV6icWwxF7Q)
![](https://lh3.googleusercontent.com/2ye2XZEvfOoBrUTp20kE5_PFRl2afajnZWaKok97ggrCWDeURYNSu-uDnm06cDzB5OWhCyBUW0yX8cBJTdzB-wzQvtMQqP91rscluMazfK1eT1mec6Ut6krgTKcx5fEJi-QZ4ANMPHiapdgX9pT_yw)
< Previous | List | Next >